
The search continues - if anyone has any liners to suggest please do leave a comment!
Some of the many others I've tried and liked:
- One of my all time favourites has been the YSL shocking false lash effect eyeliner but at over £25 a pop it's not cheap.
- I started out with the Boots own brand '17' eyeliner pens which were fine but smudged at the drop of a hat and didn't last well through the day. It's been a while since I used them though so it may well have an improved formula these days. They are significantly cheaper and I think a good one to begin with if you're a newbie and not sure it's a look you'll do a lot.
- I also quite liked the Bourjois waterproof Clubbing eyeliner for festivals but it does have a tendency to flake once it gets wet (or very old).
- I've also tried a gel liner (which comes in a little pot with a tiny liner brush separately). I can't remember for the life of me what the brand was now (I want to say Chanel but can't be sure) but it was gifted to me & had one half of the pot in navy and the other in black. I quite liked it but found it drew a very bold line and sometimes you want something more delicate. I also found it harder to draw a nice precise flick (although with this hack it might be a lot easier to achieve). If you're interested in reading further on the gel liners out there there's a good Independent article on the top 11 gel liners here.
The flick hack
The basic principle of this hack is to use tape to guide where the flick goes. I've seen it a few times on Facebook and elsewhere but have never tried it and as I'm getting back into my make-up I thought now's the time. I've seen one woman using Sellotape but to me that seemed a bit harsh on the skin - especially around the delicate eye area so I went with some low tack masking tape we have around the house. If you want a good tutorial video to watch here's one from Tina Yong and she uses surgical tape that you can pick up from your local chemist.
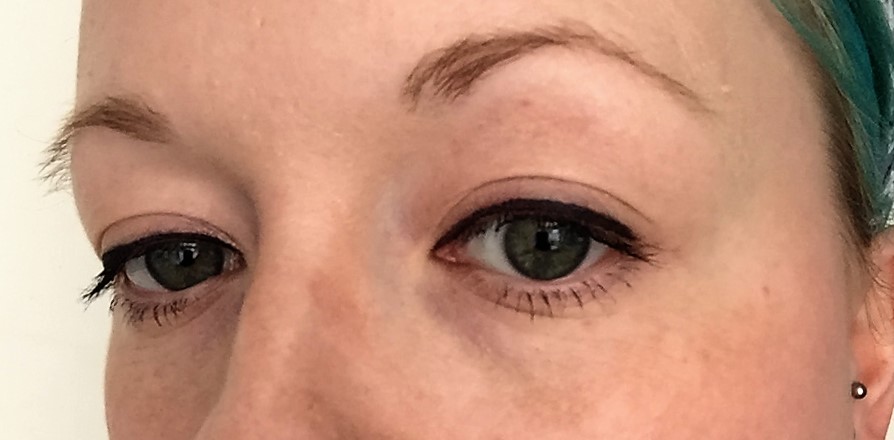
As this was more about the flick I decided to draw on the rest of the eyeliner first (please ignore my ungroomed eyebrows!):
Then I applied the tape. Where you position it depends on the angle of the flick you want - I try to continue the line up from my bottom eye rim (if that makes sense).

And then I drew on the flicks...
 |
| The tape's come away a little here - you need to make sure it's stuck down before you draw or it won't work well |
 |
| What is this face?! |
Because the tape is there you don't have to be too precise - although you do of course have to make sure the top part is neat as that's not going to change when the tape comes off. I also joined the flick up with the rest of the eyeliner more to get the classic cats eye look.
I let the liner dry and then peeled off the tape and here's the results:

As you can see from below I was really pleased with the outcome and will definitely use this hack again.

Thanks for reading.
No comments:
Post a Comment